Here's now a chapter for those who have the
manager spirit and who want to create their own chatroom.
For that, you must install a chat server on your PC. The people who
will come to chat in your room will connect directly to your PC. If
you stop the chat server or if you turn off your PC, your room will
disappear.
A.
Responsabilities
Because the manager operates a chat
server on his/her PC without any possibility of verification or
control from us, we shall not take any responsability for the use of
this server software nor for the corresponding client software.
By downloading the chat server, the manager accepts to take full
responsability of the use of this software.
We advise the manager to keep an eye on the following
responsabilities :
The manager will check the age of the chatters in the "adult"
rooms.
The manager will take care that no act against the law be
committed by the chatters.
The manager will not leave a crowded room without
surveillance, especially if it's a room that, given the title of
the room, attracts an adult public. It is advisable to be
surrounded by a team of assistant-managers that can take turns.
The manager will not use, for the title of his/her room, any
vulgar words nor insults against other chatters.
We advise the manager not to take these responsabilities lightly
if he/she wants to avoid a visit to the police consequent to a
charge filed by a chatter !
The manager can use the server's logfile to verify what's happening
in his/her room.
B. Installation
To install the chat server,
please follow steps 1 to 8 below :
Start it by clicking on the icon "CREATE_ROOM"
on your desktop.
Step 3
Enter your room's name ("Chez
Samuro"),
then select a language and a country ("Français/Belgique"),
and finally select a category (Ados, General, Adult 18+ or Erotica
21+) :
Categorie
Description
Ados
0 to 20 years
General
for all public
Conversation 18+
conversations between adults
Erotica 21+
pink rooms
Step 4
Observe the indicator "#rooms" on the chat server (see picture on
the right). This indicator counts the total number of chatrooms
existing in the system. At the beginning, when you start the chat
server, this indicator indicates 1. After a few minutes, it should
indicate a value larger than 1 (for example 67 on the picture). This
means that your room was correctly added in the room list. Continue
then at step 7 below.
If you see a TEST button colored in GREEN, it means everything is
all right, the indicator "#rooms" will change in a few minutes, you
only need to wait.
On the other hand, if you see a TEST button colored in
RED, it means
that your PC isn't correctly configured to run a server. Continue
then at step 5 hereafter.
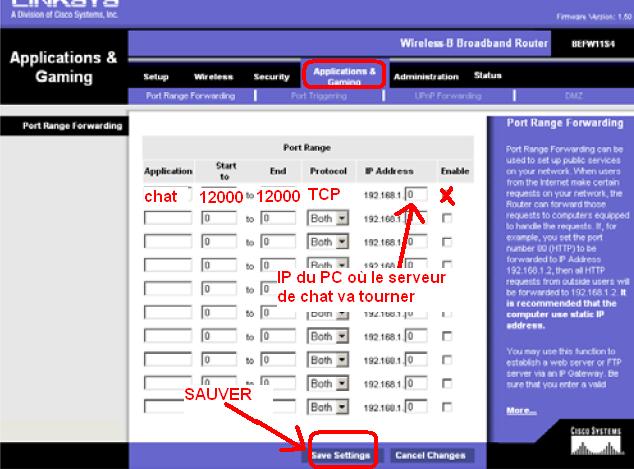
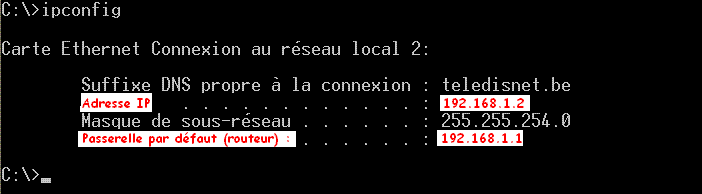
Step 5 : Router
click on the button "Start" in the left bottom corner of
your Windows screen.
click on "Run" or "Execute"
type cmd then click OK, a black box should then appear. (note: on windows 95/98, type dosprmpt instead of cmd)
type ipconfig and hit on the Enter key (in the right
bottom corner of the keyboard)
search for the two red lines on the picture hereabove.
The first one is called "IP Address", and the second below is
called "Default Gateway".
If these IP addresses start with
192.168.x.x, 10.x.x.x or
172.x.x.x then you have a router that we will have to
configurate (if they start with something else, you don't have a
router and you can jump immediately to step 6 : Firewall)
write down carefully both IPs on a sheet of paper :
- the first one is the local IP of your PC (don't confuse it
with your internet IP) - the second one is the IP of your router.
start internet explorer, and type http://xxx.xxx.xxx.xxx
where you replace xxx by the IP of your router.
in the router's user guide, find the userid and the
password for the login screen (it must often be left blank, or
you must type admin).
find the menu to add a server, it's often called "NAT" or
"Virtual Server" or "Applications & Gaming"
Add a line in the router's configuration :
application
user-defined, non-standard or type
chat
protocol TCP or UDP
TCP
number of incoming port
12000 (ou 12000 ŕ 12000) - from
chat server
number of outgoing port
12000 (ou 12000 ŕ 12000) - from
chat server
IP Address
local IP of your PC that you wrote
down on a sheet of paper
Enable
X
save the configuration.
example: the router wireless LinkSysBEFW11S4
If you don't find the menu NAT, you an also enter your PC's
local IP in the router menu "Default Server" or "DMZ".
When your router is well configured, continue at
step 6 because there's more to do.
Step 6 : Firewall
You need to autorize the port TCP 12000 in the Windows XP
firewall :
- for windows XP
click here
- for windows XP with Service Pack 2
click here
You need to autorize the port TCP 12000 in all security
software you have installed (norton, f-secure, ..)
To configurate your installed firewalls, please read the user's
guide provided with your product. Some free products (for
example Zone Alarm Standard Edition) do not allow port
configuration. You need then to purchase the professionnal
version of the product, or remove it entirely (the firewall
within Windows XP offers sufficient security to avoid all
hacking).
To check that all your firewall software that you've installed on
the PC is configured correctly, you can
download here the tiny tool testport. Start the chat server,
then type in testport the local IP of your PC (see point 5
hereabove) and port 12000 and click OK : the tool will tell you if
the port is open on all your firewalls, thus if you have correctly
executed step 6.
When all your routers and firewalls are
well-configured, then the button TEST on the chat server should
become
GREEN when you click on it, which indicates that the port is
open; if it remains RED then you must go back to step 4 above
because you surely made a mistake !
When the indicator "#rooms" on the chat server displays a value
larger than 1, continue at step 7 because it's not finished.
Step 7 : several PCs
If you have a router and you chat
from another PC than the one where you installed the server, you'll
see a line of dots where your room name normally appears and you
won't be able to enter your room, although other chatters can enter
without problem. It's because one of your PCs can't find the IP of
the other.
To solve this problem, you have two solutions :
1) the automatic method
:
open the port UDP 12000 (or 12001, ..) on the
firewall of the server PC,
open the port UDP 31977 on the firewall of the PC where
you chat,
open all CHAT.INI files on your harddisk (those of your
pseudos and of your bots); for exemple, the picture on the right
show how to open the CHAT.INI file for the pseudo SAMU ()
: type c:\chat.samu in the area (1), then click on (2), (3) et
(4)
In each file CHAT.INI, you have to add the IP
(192.168.x.x, 10.x.x.x or 172.x.x.x) and the PORT of the PC where the chat server runs. Be careful: do NOT add the IP
displayed on the chat server, it's the wrong one.
Here's a simple example :
Be careful to copy this example in a clean way without changing
anything but the IP address and PORT number !
# chat.ini

[room1]
IP   = 192.168.0.52      # IP local address of the PC
PORT = 12000            # port of chat serveur

[icons]
test01 = test.bmp
frog01 = grenouille.gif

[settings]
If you have installed 2 servers (port 12000 and 12001), you need to
indicate both ports, like this :
# chat.ini

[room1]
IP   = 192.168.0.52     # IP local address of the PC for server 1
PORT = 12000            # port of chat serveur

[room2]
IP   = 192.168.0.52     # IP local address of the PC for server 2
PORT = 12001            # port of chat serveur

[icons]
test01 = test.bmp
frog01 = grenouille.gif

[settings]
Start now the chat. If you correctly executed this step you should
see now a line with the name of your room.
Don't forget, if you create a new pseudo or you download a bot, to
repeat this operation for the new chat.ini !
Step 8 : several chat servers
If you install several chat servers
on the same router, then you must use different port numbers (12000,
12001, ..) by modifying the file chatserv.ini of each server.
Moreover, if you install several chat servers on different PCs
connected to the same router, then it is necessary to open, on the
firewalls of these PCs, the UDP ports of same number than the
already open TCP ports. If you forget to do it, then some of your
rooms will regularly appear and disappear from the room list. (note:
the router need not be changed).
Example:
on firewall of PC 1 : open port TCP 12000 and UDP 12000;
on firewall of PC 2 : open port TCP 12001 and UDP 12001; etc ...
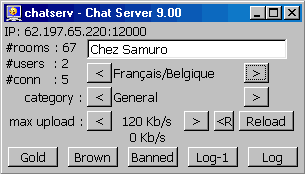
C. The Chat Server
IP
indicates your PC's IP, 12000 being
the TCP port used by the chat server.
#rooms
indicates the total number of
chatrooms currently open.
#users
indicates the number of chatters in
your room.
#conn
indicates the number of active
connections between the chat server and internet. Count 1
connection for the room list, 2 connections per chatter in
room (1 text connection + 1 camµ connection), 4
connections per whispering couple.
Room Name
allows you to indicate the name of
your room. It's not necessary to restart the server after
changing it.
Langue/Pays
indicates your language/country choice
in the room list. It's not necessary to restart the server
after changing it.
Categorie
indicates the category of your room :
Category
Description
Ados
0 to 20 years
General
open to all public
Conversation 18+
conversations between adults
Erotica 21+
pink rooms
It's not necessary to restart the server after changing the
category.
max upload
allow you to set the maximum upload
speed that you allow for the chat server.
The upper value is the maximum limit that you authorize; the
lower value changes automatically and indicated the actually
used speed.
(see also the chapter "connection speed" further in this
documentation)
Button 'R'
resets the "max upload" speed to the
default value 120
Reload
reload the file chatserv.ini - to be
used after you changed a server parameter in this file.
Gold
displays the list of gold tocs (see
chapter below "How to give a toc").
Brown
same for brown tocs.
Banned
displays the list of permanently
banned people.
Log-1
displays yesterday's room log.
Log
displays today's room log.
D.
Chat Server's Log File
The chat server produces a daily
logfile containing all the room's conversation, for example
"2003-10-12.chatserv.txt". Whispers are not recorded for privacy
protection reasons.
However, note that your internet provider can easily have access to
all dialogues on the chat, on Messenger or simply e-mail exchange,
for a police inquiry. We advise you to not do anything illegal on
the internet, it always leaves traces.
A "private" room is only accessible
to people who are invited by the room owner. To create a private
room, you need to create a file "INVITE.TXT" in the directory
"C:\chatserv". This file must contain the list of all signatures
that are allowed to enter the room (see chapter above). When this
file is created, the prefix #PRIV# appears in front of the room
title, which allows the chatters to recognize a private room.
If it doesn't work, try to rename your file into "INVITE" instead of
"INVITE.TXT" (notepad adds the hidden extension .TXT automatically,
for more details
click here)
To retransform a private room in normal room, delete the file.
G. Rooms with password
A room can be protected by a
password. Only the chatters who know the correct password can enter.
It is possible to combine private room (see previous chapter) and
room with password : only the people invited or knowing the password
may then enter.
G.1. Password controlled by the room owner
To protect a room with a password,
the room owner must create a file named "PASSWORD.TXT" in the
directory "C:\chatserv". This file must contain only the password
(to do this, start windows explorer in C:\CHATSERV, click on the
menu "Files", click on "New", then on "Text Document", then type the
filename PASSWORD, click on it to open notepad, finally type your
password and close all).
When this file is created, the prefix #PASS#
appears in front of the
room name, which allows the chatters to recognize a room with
password.
If it's not working, try to rename your file as "PASSWORD.TXT" instead of "PASSWORD" (notepad often adds automatically the hidden
extension .TXT, for more details
click here)
To remove the password protection, delete the file.
The chatters having a Toc (GOLD or BROWN) can enter the room without
giving the password.
G.2. Password controlled by GOLD Tocs
The room owner can allow the GOLD
Tocs to control the password, thanks to the command /pass.
Warning: a GOLD toc can, using this command, invite people in a
private room (see previous chapter) that were not invited by the
room owner.
To authorize the use of the command /pass, the room owner must add,
in chatserv.ini :
[security]
command-pass = enable
After having clicked on the button "Reload" from the chat server,
the following commands are available for GOLD tocs :
To protect the room with the password "borderline", type the command
:
/pass borderline
To see the current password, type :
/pass
To remove the password, type :
/pass off
H. How to create several rooms
Several rooms can be created on the
same PC. For this, you must specify, at server installation, the
number of rooms you want. The installation will then create several
directories and several icons on the desktop to start each room.
Each room will use a different tcp/ip port. The default port of the
first room is 12000. To select another port, the installation will
create automatically, in the server's directory, a file CHATSERV.INI
with the following text :
# chatserv.ini file
[listener]
port = 12001
All you need to do is to configurate your firewall and possibly your
router for these additional ports.
I. Connection Speed
Each chatter is linked to the chat
server by 2 connections :
- the first connection is used for text.
- the second connection is used for icons, webcam images, microphone
sound and profiles.
A setting on the chat server allows to set a limit on the speed used
for the second connection.
Connection
Download
Upload
max upload setting
modem 56K
32 Kbits/s
32 Kbits/s
8 ŕ 16 Kbits/s
ADSL
256 Kbits/s
128 Kbits/s
48 ŕ 120 Kbits/s
ADSL
512 Kbits/s
128 Kbits/s
48 ŕ 120 Kbits/s
ADSL
1024 Kbits/s
128 Kbits/s
48 ŕ 120 Kbits/s
ADSL
4096 Kbits/s
128 Kbits/s
48 ŕ 120 Kbits/s
SDSL
1024 Kbits/s
1024 Kbits/s
792 Kbits/s
By default, the setting is set on 120 Kbits/sec for an ADSL
connection of 512/128 Kbits/sec.
An ADSL connection download=512 Kbits/sec and upload=128 Kbits/sec
allows to send to the other chatters 128 Kbits per seconde; a
setting of 120 Kbits/sec leaves a small margin to send text and
avoid traffic jams.
If you are lucky and own a professionnel SDSL (symmétric digital
subscriber line) connection, you can set without problem to 792
Kbits/sec.
Remark: the speed of an ADSL connection is asymetric, which means
that the receiving speed (1024 Kbits/sec) and sending speed (128
Kbits/sec) are different. Unfortunately, a chat server mainly need a
fast sending speed to send text and images to all chatters at the
same time. So it's no use to increase the reception speed (1024 ou
4096 Kbits/sec) if the sending speed is limited to 128 Kbits/sec.
Usually servers are hosted on SDSL connections (symmétric) where the
reception and sending speeds are equal. Such a connection is however
too costly for a hobby chatter.

 )
: type c:\chat.samu in the area (1), then click on (2), (3) et
(4)
)
: type c:\chat.samu in the area (1), then click on (2), (3) et
(4)